Independence Day Tribute V2
Project Overview
The ESP32 Independence Tribute V2 teaches advanced techniques for creating elaborate multi-scene animations with complex particle systems and sophisticated graphics on small OLED displays using I2C communication.
This project celebrates India’s Independence Day with an elaborate animated tribute displayed on a 128×64 SSD1306 OLED featuring patriotic scenes including rocket launches, satellite orbits, atomic energy symbols, and moon missions. The sequence includes fireworks effects, rotating Ashoka Chakra animations, and emotional patriotic messages creating a comprehensive tribute experience.
When you run the project, the OLED displays a complete cinematic animation sequence starting with festive fireworks followed by India’s technological achievements. Each scene showcases different aspects of national pride including space exploration, atomic science, and cultural symbols with smooth transitions and dynamic visual effects.
Key Features: I2C communication between ESP32 and OLED displays, multi-scene animation sequence with precise timing control, advanced particle system for fireworks effects, complex graphics including rockets, satellites, and chakra symbols, rotating astronomical animations, color-coded display zones with yellow header and blue content areas, lightweight code optimized for microcontroller platforms.
Components Required
To build this project, collect these specific items from your kit and ensure each component is in good working condition.
ESP32 Development Board x 1, SSD1306 OLED Display (128×64) x 1, Breadboard x 1, Jumper Wires x 4, USB Cable x 1.
Circuit Connections
Step 1: Connect Ground Rail for Shared Reference
Connect the ESP32 GND ground pin directly to the negative rail of your breadboard to establish a shared ground connection for your entire circuit and all connected electronic components throughout the system.
Step 2: Place and Position OLED Display Module
Position the SSD1306 OLED display module carefully near the top edge of your breadboard for convenient access and proper alignment with all jumper wire connections during the assembly process to ensure success.
Step 3: Connect VCC Power Pin to Supply
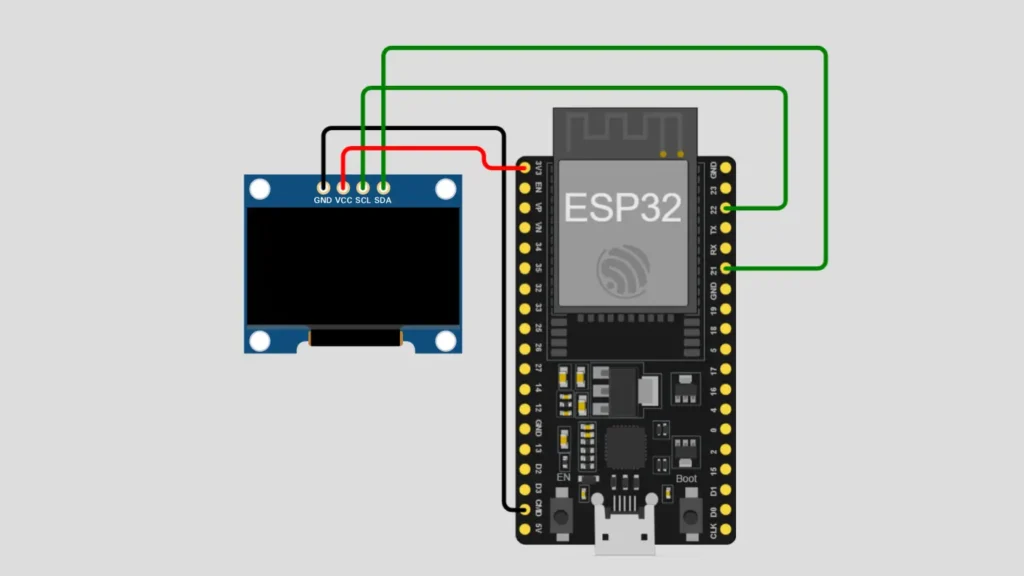
Connect the OLED VCC power pin directly to the ESP32 3.3V output pin to provide the correct voltage level and adequate power supply for the small OLED display module operation and functionality.
Step 4: Connect Ground Pin for Return Path
Connect the OLED GND ground pin to the breadboard negative rail to complete the power circuit and establish the electrical return path for all current flowing through connected components on the breadboard.
Step 5: Connect SDA Data Pin for I2C
Connect the OLED SDA serial data pin to ESP32 GPIO pin 21 to enable I2C protocol serial data transmission between the ESP32 microcontroller and the OLED display device communication successfully.
Step 6: Connect SCL Clock Pin for Timing
Connect the OLED SCL serial clock pin to ESP32 GPIO pin 22 to provide I2C timing synchronization that coordinates precise data transmission between all connected I2C devices on the bus system.
Step 7: Verify All Connections Before Upload
Double-check all four display pins for correct connections and secure jumper wire placement before uploading any code to your ESP32 microcontroller board to prevent connectivity problems during operation and testing.
Important: The SSD1306 OLED display uses the I2C protocol, a two-wire communication standard where the SDA pin transmits data and the SCL pin provides essential timing synchronization for reliable data transfer.
Software Requirements
Before uploading code to your ESP32, install the following software components, libraries, and drivers on your development system.
Arduino IDE : Download and install the latest version from the official Arduino website for code development, editing, and uploading to your microcontroller board.
ESP32 Board Package : Add the ESP32 board package to Arduino IDE by accessing Boards Manager and searching for ESP32 with proper version selection.
Adafruit GFX Library : Install this library using Arduino IDE Library Manager to access graphics drawing functions and text rendering capabilities for display output.
Adafruit SSD1306 : Install this library for complete SSD1306 OLED display control, initialization, and I2C communication protocol implementation.
CH340 USB Driver : Download and install the CH340 USB driver for your specific operating system to enable ESP32 board serial communication with your computer.
Verify Installation : Open Arduino IDE, select your ESP32 board from Tools menu, and confirm the COM port shows your connected microcontroller device.
How the Project Code Works
Initialize Particle System and Animation Resources
The setup function configures I2C communication and initializes the SSD1306 OLED display with proper addressing settings. The particle system arrays are populated with initial values while star arrays and rocket trail systems are prepared for animation playback.
Create Multi-Scene Animation Sequence Framework
The loop function orchestrates a complete sequence of animation scenes including fireworks, rocket launches, satellite orbits, and atomic energy displays. Each scene function manages its own timing and rendering creating modular animation components that play in sequence.
Implement Advanced Particle Effects for Fireworks
The particle engine supports three distinct firework burst styles including round bursts, star bursts, and cross bursts with configurable particle counts and velocity distributions. Particles are updated with gravity effects and boundary checking ensuring safe rendering within display dimensions.
Render Complex Graphics with Safe Boundary Checking
Functions like drawDetailedRocket, drawSatelliteBody, and drawChakra create intricate graphics using line drawing primitives and geometric shapes. All drawing operations include boundary validation preventing pixels from rendering outside display boundaries.
Synchronize Multi-Component Animations with Precise Timing
The project manages numerous animated elements simultaneously including spinning chakras, orbiting satellites, traversing rockets, and blinking stars. Frame-based timing ensures smooth animation by controlling display updates at consistent intervals.
Expected Output
After uploading your code to the ESP32, connect the USB cable and observe the OLED display initialization process beginning.
The OLED displays an elaborate animated tribute beginning with festive yellow and blue fireworks effects followed by patriotic messages. Scenes progress through India’s technological achievements including a detailed rocket launch sequence with launch pad, ignition effects, and space exit animations.
The tribute sequence continues with satellite orbits around Earth, atomic energy illustrations, moon mission landers, Ashoka Chakra rotations, and emotional patriotic messages. The complete animation cycles continuously creating an engaging and inspiring Independence Day celebration.
Operational Troubleshooting
OLED Display Remains Blank or Unresponsive to Code :- Verify all four display pins connect to correct ESP32 GPIO pins as specified in the circuit diagram. Check VCC and GND connections for proper power supply with adequate current. Confirm the USB cable provides sufficient power and verify the I2C address matches your OLED model..
Complex Graphics Appear Corrupted or Partially Rendered on Screen :- Confirm both Adafruit GFX and SSD1306 libraries are correctly installed in your Arduino IDE folder. Verify boundary checking functions properly protect against out-of-bounds pixel rendering. Check that the I2C communication remains stable without timing violations during complex scene rendering.
Animation Timing Appears Incorrect or Scenes Transition Too Quickly :- Verify the scene timing constants define appropriate millisecond delays for each animation stage. Check that the showFrame function delay parameter controls animation speed correctly. Adjust timing constants to slow down or accelerate scene transitions as needed.
Particle Effects Do Not Display or Fireworks Animation Appears Missing :- Ensure the particle engine is initialized properly in the setup function without errors. Verify the particle creation and update functions are being called within scene rendering loops. Check that safe pixel drawing functions constrain particles within the proper display zones.
What You Learned
By finishing this project, you understand how to orchestrate complex multi-scene animation sequences with sophisticated graphics and particle systems on OLED displays. You have learned techniques for managing multiple animated elements simultaneously while maintaining smooth performance on resource-constrained microcontroller platforms.
You can apply advanced animation orchestration techniques to create elaborate visual experiences on embedded systems with limited memory and processing power. You have experienced how procedural graphics, particle effects, and careful timing synchronization create professional cinematic presentations on microcontroller devices.
WHAT'S NEXT?
Ready to Build More?
Explore more Lifetronix projects, improve your skills, and turn your ideas into real working prototypes.