ESP32 OLED Bairan Song Lyrics
Project Overview
The ESP32 OLED Bairan Song Lyrics Visualizer teaches advanced techniques for creating dynamic text animations on small display screens using I2C communication protocols.
This project displays synchronized Bairan song lyrics on a 128×64 SSD1306 OLED display with smooth animations, special visual effects, and professional-quality text rendering capabilities.
When you run the project, animated lyrics appear on the OLED display synchronized with choreographed sequences including typewriter effects, bounce animations, and emphasis techniques for visual impact.
Key Features: I2C communication between ESP32 and OLED displays, dynamic text animation with multiple effect types, synchronized timing for complex lyric sequences, lightweight code optimized for microcontroller platforms, beginner-friendly structure with fully customizable animation parameters.
Components Required
To build this project, collect these specific items from your kit and ensure each component is in good working condition.
ESP32 Development Board x 1, SSD1306 OLED Display (128×64) x 1, Breadboard x 1, Jumper Wires x 4, USB Cable x 1.
Circuit Connections
Step 1: Connect Ground Rail for Shared Reference
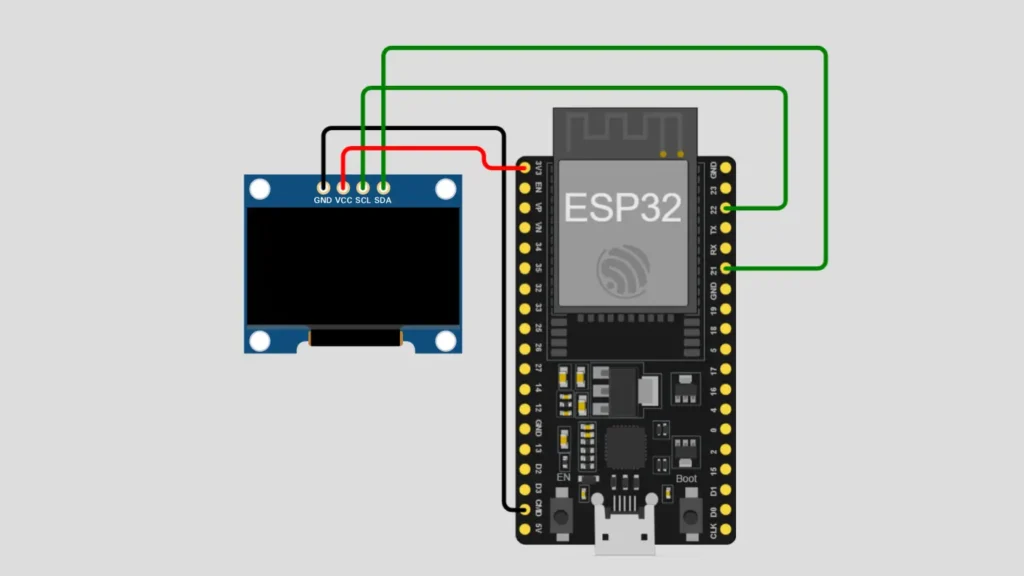
Connect the ESP32 GND ground pin directly to the negative rail of your breadboard to establish a shared ground connection for your entire circuit and all connected electronic components throughout the system.
Step 2: Place and Position OLED Display Module
Position the SSD1306 OLED display module carefully near the top edge of your breadboard for convenient access and proper alignment with all jumper wire connections during the assembly process to ensure success.
Step 3: Connect VCC Power Pin to Supply
Connect the OLED VCC power pin directly to the ESP32 3.3V output pin to provide the correct voltage level and adequate power supply for the small OLED display module operation and functionality.
Step 4: Connect Ground Pin for Return Path
Connect the OLED GND ground pin to the breadboard negative rail to complete the power circuit and establish the electrical return path for all current flowing through connected components on the breadboard.
Step 5: Connect SDA Data Pin for I2C
Connect the OLED SDA serial data pin to ESP32 GPIO pin 21 to enable I2C protocol serial data transmission between the ESP32 microcontroller and the OLED display device communication successfully.
Step 6: Connect SCL Clock Pin for Timing
Connect the OLED SCL serial clock pin to ESP32 GPIO pin 22 to provide I2C timing synchronization that coordinates precise data transmission between all connected I2C devices on the bus system.
Step 7: Verify All Connections Before Upload
Double-check all four display pins for correct connections and secure jumper wire placement before uploading any code to your ESP32 microcontroller board to prevent connectivity problems during operation and testing.
Important: The SSD1306 OLED display uses the I2C protocol, a two-wire communication standard where the SDA pin transmits data and the SCL pin provides essential timing synchronization for reliable data transfer.
Software Requirements
Before uploading code to your ESP32, install the following software components, libraries, and drivers on your development system.
Arduino IDE : Download and install the latest version from the official Arduino website for code development, editing, and uploading to your microcontroller board.
ESP32 Board Package : Add the ESP32 board package to Arduino IDE by accessing Boards Manager and searching for ESP32 with proper version selection.
Adafruit GFX Library : Install this library using Arduino IDE Library Manager to access graphics drawing functions and text rendering capabilities for display output.
Adafruit SSD1306 Library : Install this library for complete SSD1306 OLED display control, initialization, and I2C communication protocol implementation.
CH340 USB Driver : Download and install the CH340 USB driver for your specific operating system to enable ESP32 board serial communication with your computer.
Verify Installation : Open Arduino IDE, select your ESP32 board from Tools menu, and confirm the COM port shows your connected microcontroller device.
How the Project Code Works
Initialize I2C Communication
The setup function configures GPIO pins 21 and 22 for I2C protocol communication with a 400kHz clock speed for fast and reliable data transmission between devices. Wire.begin() initializes the I2C bus and sets up proper communication parameters for connecting with the SSD1306 OLED display module successfully.
Load Animation Sequences from Bitmap
The bitmap.h header file contains all animation frames stored as bitmap arrays for efficient memory usage on the ESP32 microcontroller. The gif_frames array references each bitmap frame that displays sequentially to create smooth animated text and visual effects.
Process Frame Timing Events
The loop function iterates through each bitmap frame using the ANIM_FRAME_COUNT constant to determine the total number of frames in the animation sequence. The delay function controls the timing between frames to create smooth animation playback at the desired speed.
Render Frames to Display
The code clears the OLED display buffer and draws each bitmap frame using the drawBitmap function from the Adafruit GFX library. The display.display() function updates the OLED screen with the current frame data stored in the display buffer.
Continuous Animation Playback
The animation loops continuously by repeating the frame sequence after reaching the final frame in the animation cycle. Users can adjust the delay value to control animation speed and create different visual effects.
Expected Output
After uploading your code to the ESP32, connect the USB cable and observe the display initialization process beginning.
The display shows animated Bairan song lyrics appearing with smooth text animations and professional effects playing continuously throughout the sequence. Watch the animations display frames one by one across the screen with beautiful timing and professional visual polish.
The animation cycles through the entire frame sequence and automatically restarts after reaching the final frame. Enjoy the synchronized visual experience with perfectly timed animation effects creating an engaging and professional presentation.
Operational Troubleshooting
OLED Display Remains Blank or Unresponsive to Code :- Verify all four display pins connect to correct ESP32 GPIO pins as specified in the circuit diagram. Check VCC and GND connections for proper power supply with adequate current. Confirm the USB cable provides sufficient power and verify the I2C address matches your OLED model.
Animations Display But Frames Appear Corrupted or Distorted :- Confirm both Adafruit GFX and SSD1306 libraries are correctly installed in your Arduino IDE folder. Check the I2C clock speed is set to 400kHz for optimal communication between microcontroller and display device. Verify the bitmap.h file is in the same directory as your sketch before uploading.
Frame Animation Timing Appears Too Fast or Too Slow :- Verify the delay value in the loop function controls frame timing properly in milliseconds. Check that ANIM_FRAME_COUNT matches the actual number of bitmap frames defined in bitmap.h file. Adjust the delay parameter to control animation speed and create desired playback effects.
Display Shows Partial Frames or Rendering Issues Appear :- Ensure all jumper wire connections are secure with no loose contacts interrupting data transmission between devices. Verify the I2C data lines SDA and SCL are not shorted together or connected incorrectly. Reduce the I2C clock speed slightly if communication errors persist due to environmental interference or variations.
What You Learned
By finishing this project, you understand how I2C communication works between microcontrollers and peripheral devices like OLED displays. You have learned techniques for rendering animated bitmap frames on small screens and managing frame timing with precise synchronization using microcontroller code.
You can apply Arduino framework libraries to create smooth animations running reliably on embedded platforms and microcontroller systems. You have experienced how bitmap animations provide efficient memory usage for displaying complex visual sequences on resource-constrained devices.
WHAT'S NEXT?
Ready to Build More?
Explore more Lifetronix projects, improve your skills, and turn your ideas into real working prototypes.