ESP32 OLED AI Drawing Pad V2
Project Overview
The ESP32 OLED Drawing Pad V2 teaches advanced techniques for creating AI-powered interactive applications using handwriting recognition and cloud-based machine learning services integrated with microcontroller platforms.
This project creates an intelligent drawing application on a 128×64 SSD1306 OLED display with web browser control and automatic handwriting recognition capability. The system recognizes handwritten letters, numbers, geometric shapes, and words then displays the results on the OLED with appropriate graphics and formatting.
When you run the project, the ESP32 creates a WiFi network hosting a web interface where users draw on an interactive canvas. The drawing is sent to Google Handwriting Recognition API which analyzes the stroke patterns and returns candidate matches that are validated and displayed on the OLED display.
Key Features: I2C communication between ESP32 and OLED displays, WiFi web server with embedded HTML interface, handwriting recognition integration with cloud services, shape detection and rendering with custom graphics, word recognition for social media phrases, real-time OLED display updates, responsive canvas with touch and mouse support, lightweight code optimized for microcontroller platforms.
Components Required
To build this project, collect these specific items from your kit and ensure each component is in good working condition.
ESP32 Development Board x 1, SSD1306 OLED Display (128×64) x 1, Breadboard x 1, Jumper Wires x 4, USB Cable x 1.
Circuit Connections
Step 1: Connect Ground Rail for Shared Reference
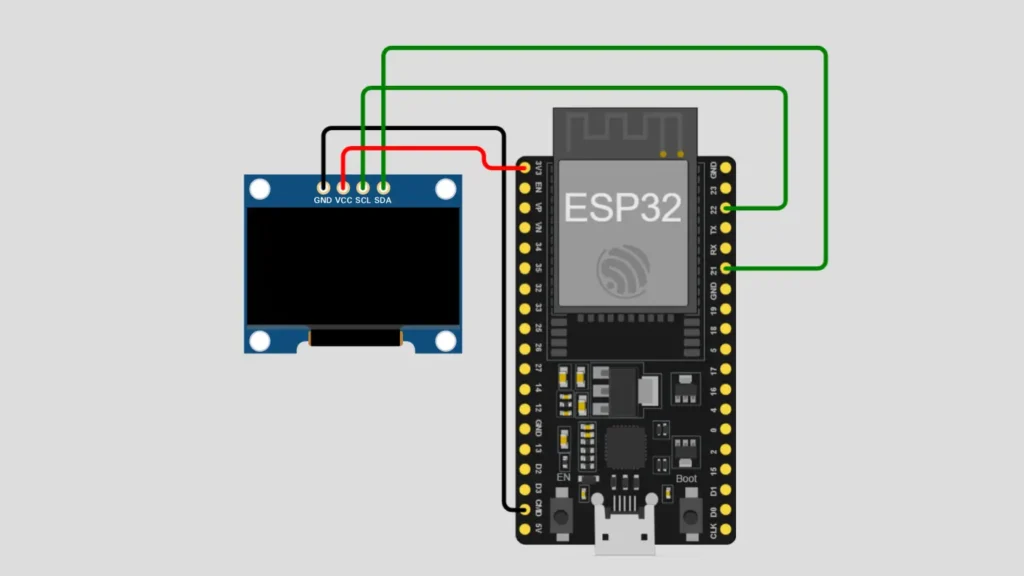
Connect the ESP32 GND ground pin directly to the negative rail of your breadboard to establish a shared ground connection for your entire circuit and all connected electronic components throughout the system.
Step 2: Place and Position OLED Display Module
Position the SSD1306 OLED display module carefully near the top edge of your breadboard for convenient access and proper alignment with all jumper wire connections during the assembly process to ensure success.
Step 3: Connect VCC Power Pin to Supply
Connect the OLED VCC power pin directly to the ESP32 3.3V output pin to provide the correct voltage level and adequate power supply for the small OLED display module operation and functionality.
Step 4: Connect Ground Pin for Return Path
Connect the OLED GND ground pin to the breadboard negative rail to complete the power circuit and establish the electrical return path for all current flowing through connected components on the breadboard.
Step 5: Connect SDA Data Pin for I2C
Connect the OLED SDA serial data pin to ESP32 GPIO pin 21 to enable I2C protocol serial data transmission between the ESP32 microcontroller and the OLED display device communication successfully.
Step 6: Connect SCL Clock Pin for Timing
Connect the OLED SCL serial clock pin to ESP32 GPIO pin 22 to provide I2C timing synchronization that coordinates precise data transmission between all connected I2C devices on the bus system.
Step 7: Verify All Connections Before Upload
Double-check all four display pins for correct connections and secure jumper wire placement before uploading any code to your ESP32 microcontroller board to prevent connectivity problems during operation and testing.
Important: The SSD1306 OLED display uses the I2C protocol, a two-wire communication standard where the SDA pin transmits data and the SCL pin provides essential timing synchronization for reliable data transfer.
Software Requirements
Before uploading code to your ESP32, install the following software components, libraries, and drivers on your development system.
Arduino IDE : Download and install the latest version from the official Arduino website for code development, editing, and uploading to your microcontroller board.
ESP32 Board Package : Add the ESP32 board package to Arduino IDE by accessing Boards Manager and searching for ESP32 with proper version selection.
Adafruit GFX Library : Install this library using Arduino IDE Library Manager to access graphics drawing functions and text rendering capabilities for display output.
Adafruit SSD1306 Library : Install this library for complete SSD1306 OLED display control, initialization, and I2C communication protocol implementation.
CH340 USB Driver : Download and install the CH340 USB driver for your specific operating system to enable ESP32 board serial communication with your computer.
Verify Installation : Open Arduino IDE, select your ESP32 board from Tools menu, and confirm the COM port shows your connected microcontroller device.
How the Project Code Works
Initialize Display and WiFi Connectivity for Web Server
The setup function configures the SSD1306 OLED display with I2C communication while simultaneously establishing WiFi connection to user-specified network. The ESP32 then initializes the WebServer listening on port 80 for incoming HTTP requests from connected browser clients.
Implement Web Interface with Drawing Canvas and Controls
The embedded HTML page includes a 320×320 pixel canvas element where users draw using mouse or touchscreen input. The JavaScript code captures canvas drawing strokes tracking coordinates and timestamps creating an ink array that represents the handwritten input.
Send Drawing Data to Google Handwriting Recognition API
After completing each stroke with a configurable timeout delay, the client sends the captured ink data to Google Handwriting Recognition endpoint. The API analyzes the stroke pattern and returns candidate recognition matches ranked by confidence score for evaluation.
Validate Recognition Results Against Supported Token List
The client receives recognition candidates from Google API and validates each match against a predefined list of supported outputs. Valid outputs include uppercase letters A-Z, digits 0-9, shape names, and social media phrases ensuring only intended results display.
Render Recognized Output with Conditional OLED Formatting
The ESP32 routes recognized tokens to appropriate rendering functions based on type including shape drawing for geometric patterns and text display. Text size and positioning are automatically adjusted based on content length ensuring centered display of all recognized results.
Expected Output
After uploading your code to the ESP32, connect the USB cable and open the Serial Monitor at 115200 baud rate.
The OLED display remains black initially then shows connection information when the device joins the specified WiFi network. Users connect to the network and open a browser to the IP address displayed in Serial Monitor which loads an interactive drawing interface.
The web canvas shows a white drawing area where users draw shapes and characters which are automatically recognized and displayed on the OLED. Letters and numbers display large and centered while shape names show custom graphics and social media words display as centered text.
Operational Troubleshooting
OLED Display Remains Blank or Unresponsive to Code :- Verify all four display pins connect to correct ESP32 GPIO pins as specified in the circuit diagram. Check VCC and GND connections for proper power supply with adequate current. Confirm the USB cable provides sufficient power and verify the I2C address matches your OLED model.
WiFi Does Not Connect or Web Interface Remains Inaccessible :- Verify the WiFi network name and password in the code match your actual wireless network credentials. Check that your ESP32 is within range of the WiFi router with adequate signal strength. Restart the ESP32 board using the reset button and monitor Serial output for connection status messages.
Handwriting Recognition Fails or Returns No Valid Results :- Ensure the ESP32 has active internet connectivity to reach the Google Handwriting Recognition API endpoint. Verify drawn strokes are clear and distinct with good contact on the canvas. Check that recognition results are included in the valid outputs list or expand the list to include additional characters.
Drawing Updates Do Not Appear on OLED Display After Recognition :- Confirm both Adafruit GFX and SSD1306 libraries are correctly installed in your Arduino IDE folder. Verify the HTTP POST request reaches the ESP32 server by checking for acknowledgment responses. Check that the OLED I2C communication remains stable without data transmission errors interrupting updates.
What You Learned
By finishing this project, you understand how to integrate cloud-based artificial intelligence services with embedded microcontroller applications for advanced recognition capabilities. You have learned techniques for combining web interfaces, handwriting recognition, and real-time OLED display rendering to create sophisticated interactive applications on resource-constrained platforms.
You can apply cloud API integration to create smart embedded devices with machine learning capabilities and AI-powered decision making. You have experienced how to synchronize client-side validation with server-side rendering to create seamless user experiences on embedded systems connected to cloud services.
WHAT'S NEXT?
Ready to Build More?
Explore more Lifetronix projects, improve your skills, and turn your ideas into real working prototypes.