Independence Day Tribute V1
Project Overview
The ESP32 OLED Independence Day Tribute teaches advanced techniques for creating animated patriotic displays using typewriter effects and cinematic transitions on small OLED screens.
This project celebrates India’s Independence Day with an animated tribute displayed on a 128×64 SSD1306 OLED featuring patriotic messages with smooth typewriter text animations. The sequence includes a fixed header with a pulsing heart, cinematic transitions between messages, and a special finale displaying the message “I ♥ INDIA”.
When you run the project, the OLED displays an engaging animation sequence beginning with a date reveal followed by carefully timed patriotic messages. Each line of text appears character by character with typewriter effects while smooth transitions and heart pulses create an emotional and visually engaging Independence Day celebration.
Key Features: I2C communication between ESP32 and OLED displays, typewriter-style text animation with character-by-character reveal, cinematic transitions with sliding wipes and effects, pulsing heart animation with dynamic scaling, fixed header with centered text rendering, multi-stage animation sequence with timing control, lightweight code optimized for microcontroller platforms, beginner-friendly structure with customizable patriotic messages.
Components Required
To build this project, collect these specific items from your kit and ensure each component is in good working condition.
ESP32 Development Board x 1, SSD1306 OLED Display (128×64) x 1, Breadboard x 1, Jumper Wires x 4, USB Cable x 1.
Circuit Connections
Step 1: Connect Ground Rail for Shared Reference
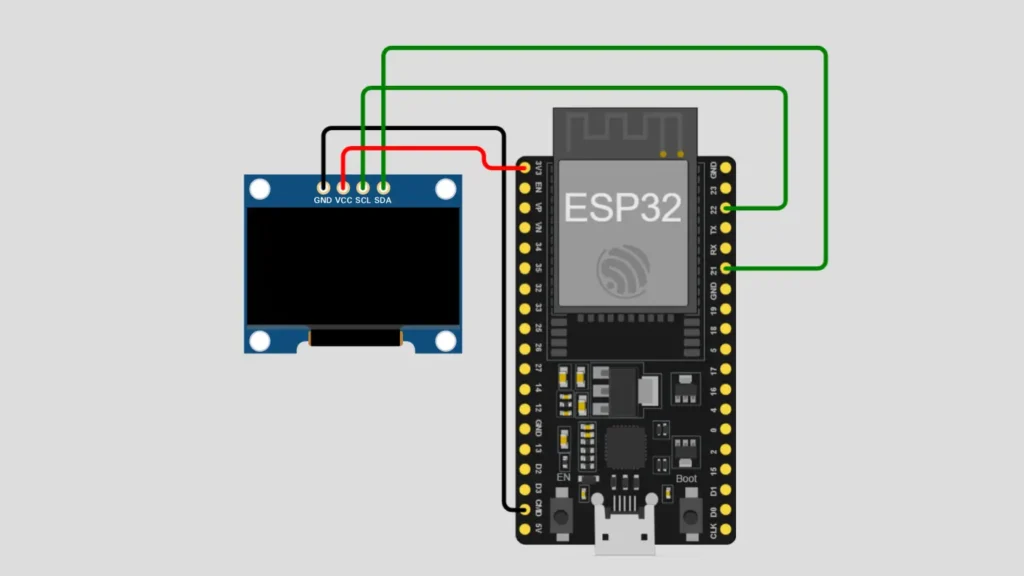
Connect the ESP32 GND ground pin directly to the negative rail of your breadboard to establish a shared ground connection for your entire circuit and all connected electronic components throughout the system.
Step 2: Place and Position OLED Display Module
Position the SSD1306 OLED display module carefully near the top edge of your breadboard for convenient access and proper alignment with all jumper wire connections during the assembly process to ensure success.
Step 3: Connect VCC Power Pin to Supply
Connect the OLED VCC power pin directly to the ESP32 3.3V output pin to provide the correct voltage level and adequate power supply for the small OLED display module operation and functionality.
Step 4: Connect Ground Pin for Return Path
Connect the OLED GND ground pin to the breadboard negative rail to complete the power circuit and establish the electrical return path for all current flowing through connected components on the breadboard.
Step 5: Connect SDA Data Pin for I2C
Connect the OLED SDA serial data pin to ESP32 GPIO pin 21 to enable I2C protocol serial data transmission between the ESP32 microcontroller and the OLED display device communication successfully.
Step 6: Connect SCL Clock Pin for Timing
Connect the OLED SCL serial clock pin to ESP32 GPIO pin 22 to provide I2C timing synchronization that coordinates precise data transmission between all connected I2C devices on the bus system.
Step 7: Verify All Connections Before Upload
Double-check all four display pins for correct connections and secure jumper wire placement before uploading any code to your ESP32 microcontroller board to prevent connectivity problems during operation and testing.
Important: The SSD1306 OLED display uses the I2C protocol, a two-wire communication standard where the SDA pin transmits data and the SCL pin provides essential timing synchronization for reliable data transfer.
Software Requirements
Before uploading code to your ESP32, install the following software components, libraries, and drivers on your development system.
Arduino IDE : Download and install the latest version from the official Arduino website for code development, editing, and uploading to your microcontroller board.
ESP32 Board Package : Add the ESP32 board package to Arduino IDE by accessing Boards Manager and searching for ESP32 with proper version selection.
Adafruit GFX Library : Install this library using Arduino IDE Library Manager to access graphics drawing functions and text rendering capabilities for display output.
Adafruit SSD1306 : Install this library for complete SSD1306 OLED display control, initialization, and I2C communication protocol implementation.
CH340 USB Driver : Download and install the CH340 USB driver for your specific operating system to enable ESP32 board serial communication with your computer.
Verify Installation : Open Arduino IDE, select your ESP32 board from Tools menu, and confirm the COM port shows your connected microcontroller device.
How the Project Code Works
Initialize Display and Animation Timing Configuration
The setup function configures the I2C pins for OLED communication and initializes the SSD1306 display with proper addressing and communication settings. The project defines animation timing constants controlling the speed of typewriter effects, transition delays, and heart pulse animations.
Implement Typewriter Text Animation with Character Reveal
The animateTwoLines and animateSingleLine functions display text character by character creating a typewriter effect where each letter appears with a configurable delay. Text positioning is calculated once and remains centered throughout the animation ensuring consistent visual presentation.
Render Dynamic Heart Animation with Pulsing Effects
The drawHeart function creates a heart shape using filled circles and triangles while the pulseHeart function animates the heart scaling between sizes. The pulsing effect enhances emotional impact during patriotic message transitions and display sequences.
Create Cinematic Transitions with Clearing and Sliding Effects
The clearBlueTransition function progressively removes text from the display using horizontal wipes creating a cinematic clearing effect. The intro function implements sliding animations where the header enters from the left side creating dynamic visual transitions.
Manage Multi-Stage Animation Sequence with Timing Control
The playVideo function orchestrates the complete animation sequence calling individual animation functions in sequence with proper timing between stages. The loop function continuously replays the animation creating an engaging repeating display.
Expected Output
After uploading your code to the ESP32, connect the USB cable and observe the OLED display initialization process beginning.
The OLED shows an animated date reveal followed by patriotic messages appearing with typewriter effects and a fixed header displaying the message “I ♥ INDIA”. Each message is accompanied by smooth transitions and heart pulses creating an emotionally engaging patriotic tribute.
The complete animation sequence cycles continuously throughout the ESP32 operation displaying multiple patriotic messages with consistent timing and visual polish. The cinematic transitions between messages create professional visual effects enhancing the celebration atmosphere.
Operational Troubleshooting
OLED Display Remains Blank or Unresponsive to Code :- Verify all four display pins connect to correct ESP32 GPIO pins as specified in the circuit diagram. Check VCC and GND connections for proper power supply with adequate current. Confirm the USB cable provides sufficient power and verify the I2C address matches your OLED model..
Text Appears But Animation Timing Looks Incorrect or Too Fast :- Verify the animation timing constants including LETTER_DELAY and LINE_DELAY define proper millisecond values for character reveal. Check that the delay functions are properly called between animation frames. Adjust timing constants to control animation speed and create desired visual effects.
Heart Animation Does Not Pulse or Appears Distorted on Display :- Confirm both Adafruit GFX and SSD1306 libraries are correctly installed in your Arduino IDE folder. Verify the drawHeart function parameters match the display resolution and coordinate system. Check that the pulseHeart function is being called with correct line parameters.
Display Shows Partial Text or Rendering Issues During Transitions :- Ensure all jumper wire connections are secure with no loose contacts interrupting data transmission between devices. Verify the clearDisplay and display functions are called at proper intervals to update the screen. Check that the I2C communication remains stable without timing violations during transitions.
What You Learned
By finishing this project, you understand how to create complex multi-stage animation sequences with typewriter effects and cinematic transitions on OLED displays. You have learned techniques for managing animation timing, implementing smooth transitions, and synchronizing multiple visual effects to create emotionally engaging patriotic presentations.
You can apply animation sequencing techniques to create commemorative displays and celebratory presentations on embedded systems. You have experienced how careful timing and visual effects enhance emotional impact and create memorable viewing experiences on resource-constrained microcontroller platforms.
WHAT'S NEXT?
Ready to Build More?
Explore more Lifetronix projects, improve your skills, and turn your ideas into real working prototypes.